Tuesday 20 November 2012

Cherry Cheese Danish

Working back shift has it's pros and cons....I try my best to keep my spirits high and keep busy. Right now is more of the slower season so I have more time to do sweet treats for the crew.  The other night I made a Cherry Cheese Danish and it was a big hit! This is so delishes and looks pretty and is actually very easy to make! You won't have to run to Tim's or your favorite bakery any more! This will be your go-to dessert, I promise!

Cheery (or blueberry, apple, strawberry) Cheese Danish

1/4 cup warm water
1 Tbsp yeast
1/2 tsp sugar
1/2 cup sour cream
1/4 cup butter
1/4 cup sugar
1/2 tsp salt
1 egg
2 cup flour
8 oz cream cheese, softened
1/4 cup sugar
1/2 tsp vanilla

1 to 2 cups favorite canned pie filling

1. Mix warm water, 1/2 tsp sugar and yeast together in a medium size mixing bowl
2. Let sit for 5 minutes or so
3. In a small saucepan, mix together the butter and sour cream. Stir over medium heat until butter melts and the two are combined. 
4. Add sugar and salt. Stir over low heat until sugar is completely dissolved.
5. Remove from heat and allow to cool for a few moments. Add the egg and whisk.
6. Add sour cream mixture to water and yeast mixture. 
7. Add flour and mix well.
8. Cover the dough and chill for at least 2 hours.
9. Meanwhile, beat cream cheese with sugar and vanilla until nice and smooth. 
10. On a floured surface, roll out dough into a large rectangle.
11. Cut slits on either side about 2 inches apart. Spread cream cheese mixture down the middle, then the fruit filling of your choice on top.
12. Fold the flaps of the dough back over the center to make it look like a braid.
13. Bake in a preheated 350 degree F oven on a parchement lined baking sheet for 15 to 18 minutes until golden brown.
Allow to cool on pan and drizzle a icing sugar glaze over danish. 

enjoy!

Cheery Cheese Danish 


Sliced and ready to enjoy!

Sunday 11 November 2012

Toasted Coconut and Almond Fudge Shortbread Bars :)

Sometimes I just feel the need to bake. My jeans really can't take much more of my baking and eating fits, but I just love being in the kitchen. I had limited ingredients today so I set out and googled "sweetened condensed milk".
I found and recipe and made it my own.
If you're in the mood for a sweet treat, this is a good one!

Toasted Coconut and Almond Fudge Shortbread Bars

  1cup butter, softened
1/2 cup icing sugar
1/4 tsp salt
1 1/4 cups  all-purpose flour
2 cups semi-sweet chocolate chips
1 can Sweetened Condensed Milk
1/2 tsp vanilla extract
Sliced almonds, toasted
Shredded coconut, toasted

Preheat oven to 350° F

1. Beat butter, sugar, and salt until fluffy. Add flour; mix well.
2. With floured hands, press evenly into 13x9 parchment paper-lined baking pan. Bake in preheated oven for 20 to 25 minutes or until lightly browned. Let cool.
3. Melt chips with sweetened condensed milk over low heat, stirring constantly. Remove from heat ; stir in extract. Spread evenly over shortbread.
4. Garnish with almonds and coconut ; press down firmly. Chill 3 hours or until firm. Cut into bars. Store covered at room temperature.


:) Enjoy

Tuesday 6 November 2012

Best Ever Chocolate Chip Cookies

My cousin gave me a journal filled with recipes, hand written by her, for a Christmas gift back eight or nine years ago....recipes for cookies, casseroles, cakes....you name it! It's in there! Her mothers recipes, MY mothers recipes, her mother-in-laws recipes. Under some recipes, there are even personal comments on who's recipe it is, and how much the food item is enjoyed by her family and friends! Considering the meals we shared together and our family history of the love of food, this was a great gift. The pages are now well worn..some pages are even sticky! There were some blank pages when I received the book, but they are now filled. I love this cook book and no matter how many others I have, I always ended up back in this one for most things. One of my favorite go-to cookies when I just want something sweet in the house, or something to take to friends, is her chocolate chip cookie recipe. I have had many cookies, and these are the BEST EVER! (My Nanny made some awesome chocolate chip cookies too, but no matter how many times I tried that recipe they never tasted like hers!) Today I made these cookies and added some Reese's chips along with the regular Milk Chocolate chips I usually add. Yup, success! They are yummy and I'm sure my friends will enjoy them too! Here's the recipe and few photos :)


Chocolate Chip Cookies

1 cup unsalted butter
1 cup brown sugar
1/2 cup white sugar
1 egg
1 egg yolk
1 tsp vanilla

2 cups flour
1/2 tsp baking soda

1-2 cups chocolate chips

In a microwavable mixing bowl, melt butter.
Add sugars and beat with electric mixer until soft and smooth.
Add egg and egg yolk. Beat until smooth.
Stir in vanilla.

Sift in flour and baking soda. Stir until combined.
Add chocolate chips.

Refrigerate for 15 minutes.

Preheat oven to 350 degrees F

Line a large cookie sheet with parchment paper.

Using a small cookie scoop or two spoons, (or roll into 1 inch balls) place cookie batter
about 3 inches apart. Back for 10 to 12 minutes or until golden, but still soft in the center. 

Cool on cooling rack and enjoy!

Monday 13 August 2012

Roasted Red Pepper and Mozza Stuffed Chicken Breast

After 14 days of "easing back to work"...I am home for a few short days before returning to the regular 12 hour days + over time.
During the first 9 days I was feeling more than great. Not noticing the pain much at all and very happy to be back to work. The last 5 days...not so much. Although I tried my best not to let the pain in my left wrist...hand...forearm...bother me, it did cause a few moments of tears and frustration. I do hope this ends soon.

My lovely picked me up early yesterday morning and drove into Sydney for breakfast at Smitty's! A great start to a Sunday morning. Later in the day we visited our local Foodland and got a few items for supper. Darryl had purchased some fresh mozzarella so we decided our meal that evening would be based on that ingredient! Excellent! I love cheese!

Darryl made a wonderful homemade marinara sauce out of sweet mini-tomatoes and sliced some mozza up in nice thick pieces. After breading them in some Italian seasoned bread crumbs and pan frying them in butter, we topped it off with the sauce and had a wonderful appetizer! Delish!

For the main course, I took some baby red and orange bell peppers and roasted them off. Sliced open some chicken breast, seasoned them with Oregano, Salt, Pepper, a few slices of Mozza and the freshly roasted peppers (peeled and seeded of course!) wrapped them in some bacon and baked them in the oven. I served them up with smashed red skinned potatoes with butter, fresh basil and minced garlic....sauted baby bella mushrooms and asparagus!  


There is really nothing better than being home! 

Tuesday 17 July 2012

Comfort Food on a grey summers day…..


Over the last few weeks the weather has been so nice and so hot that the thought of cooking up a big meal in the oven or on the stove top was anything but enticing. For the most part I've also been too sore to do much of a production for a meal anyhow. The last few days, with new meds and good therapy, I’ve been feeling more like myself. I decided with the cloudy, not too hot, grey day, I would make something I haven’t had in a long long time, Beef Bourguignon! I set out with a couple of ideas in mind, a book from school and of course, google.  I located a few different recipes, one of which was Julia Child’s version. I tweaked it a little and came up with a lovely dish! Here is the recipe for you to enjoy! (This is enough for three to four people!)


4 pieces of bacon, uncooked, diced
olive oil 
2 pounds stew beef, cut into 2-inch cubes 
1 onion, chopped
2 Carrots, chopped
Salt and pepper 
2 tablespoons flour 
2 cups red wine, deep and rich (and something you would drink!)
3 cups beef stock 
1 tablespoon tomato paste 
2 cloves garlic, smashed
1/2 teaspoon thyme 
1 bay leaf 
20 small white pearl onions 
3 1/2 tablespoons butter 
3/4 pound fresh mushrooms, quartered
Handfull of snow peas


Preheat oven to 450 degrees. 

Sauté bacon in 1 tablespoon of the olive oil in a flameproof casserole over moderate heat for 2 to 3 minutes to brown lightly. Remove to side dish with a slotted spoon. 

Heat fat in casserole until almost smoking. Dry beef in paper towels; it will not brown if it is damp. Add beef, a few pieces at a time, and sauté until nicely browned on all sides.
Add it to the bacon. 

In the same fat, brown the onions and carrot. Pour out the excess fat. 

Return the beef and bacon to the casserole and toss with 1/2 teaspoon salt and 1/4 teaspoon pepper. Then sprinkle on the flour and toss again to coat the beef lightly. Set casserole uncovered in middle position of preheated oven for 4 minutes. Toss the meat again and return to oven for 4 minutes (this browns the flour and coves the meat with a light crust). 

Remove casserole and turn oven down to 300 degrees. 

Stir in wine and 2 cups stock, just enough so that the meat is barely covered. Add the tomato paste, garlic, and herbs.

Bring to a simmer on top of the stove. 

Cover casserole and set in the oven. Simmer very slowly for 3 to 4 hours. The meat is done when a fork pierces it easily. 

During the last hour of cooking, prepare the onions, mushrooms and snow peas. 

Bring a pot of water to a rolling boil. Dump in all the onions, skins on, and boil hard for 1 minutes. Plunge into a bowl of cold icy water. This will help peel off the skins easily! Remove from the water and set aside in a paper towel -lined bowl.

Heat 1 1/2 tablespoons butter with one and one-half tablespoons of the oil until bubbling in a skillet. Add white pearl onions and sauté over moderate heat for about 10 minutes, rolling them so they will brown as evenly as possible. Add 1/2 cup of the stock, salt and pepper, a little more thyme and another garlic clove minced if you wish. Simmer, uncovered until the onions are tender but still hold their shape and all of the liquid has evaporated. 

Wipe out skillet and heat remaining oil and butter over high heat. Add mushrooms. Toss and shake pan for 4 to 5 minutes. As soon as they have begun to brown lightly, remove from heat. 

When the meat is tender, pour the contents of the casserole into a sieve set over a saucepan. 

Return the beef, bacon and carrot back into the casserole. Add the cooked onions and mushrooms on top. Sauté the peas and add as well. 

Skim fat off sauce in saucepan. Simmer sauce for 1-2 minutes, skimming off additional fat as it rises. You should have about 2 1/2 cups of sauce thick enough to coat a spoon lightly. If too thin, boil it down rapidly. If too thick, mix in a few tablespoons stock. Taste carefully for seasoning. 

Pour sauce back over meat and vegetables. Cover and simmer 2 to 3 minutes to combine everything. Serve with potatoes, noodles or rice!


Friday 29 June 2012

Blueberry Cake

I haven't been in the mood to write in a while. I've been distracted and in pain with an arm injury but I could go on and on about that.... SO...I decided today that I needed something spirit lifting. 
I set aside my bad mood and opened up my cupboard. I decided I wanted muffins. I had some fresh blueberries (from the U.S.A. since it's not the season here yet) and set out with a plan. After coming up with a recipe that I had found online awhile ago, I decided I'd just make a cake with it instead of muffins. It turned out delish and is really helping to brighten my mood!


Blueberry Cake

Ingredients:
1 1/2 cups all-purpose flour
3/4 cup white sugar
1/2 teaspoon salt
2 teaspoons baking powder
1/3 cup vegetable oil
1 egg
1/3 cup milk
1 cup fresh blueberries

Topping:
1/2 cup white sugar
1/3 cup all-purpose flour
1/4 cup butter, cubed
1 1/2 teaspoons ground cinnamon


Preheat oven to 400 degrees F (200 degrees C). Line a 9inch square pan with parchment

To Make Crumb Topping: Mix together 1/2 cup sugar, 1/3 cup flour, 1/4 cup butter, and 1 1/2 teaspoons cinnamon. Mix with fork or rub together with your fingers.

Set aside.

Combine 1 1/2 cups flour, 3/4 cup sugar, salt and baking powder. Place vegetable oil into a 1 cup measuring cup; add the egg and enough milk to fill the cup. Mix this with flour mixture. Fold in blueberries. 

Spread into prepared pan and sprinkled with topping.

Bake for 30 -35 minutes in the preheated oven, or until done.                

Remove from pan and let cool until you can no longer stand the aroma and dig in!!


:) 

Wednesday 13 June 2012

Perfectly Perfect Chicken Pot Pie :)


  • This is a family favorite! You can add whatever veggies you like, substitute Chicken for Turkey...or even for Beef (using beef broth instead of the chicken broth of course! :) ) The biscuit topping is the show stopper! The recipe for the topping is actually Coffeehouse Scones from www.joyofbaking.com! The BEST website ever, just sayin'! 

  • Filling:

  • 1 lb of Cooked chicken, roughly chopped
  • 2 cups frozen peas and carrots
  • 1 cup turnip, small diced
  • 1/3 cup chopped onion
  • 1/3 cup chopped celery
  • 1/3 cup butter
  • 1/3 cup all-purpose flour
  • 1/2 teaspoon salt
  • 1/4 teaspoon black pepper
  • 1/2 teaspoon thyme or summer savory
  • 2 1/4 cups chicken broth

In a medium to large pot, melt butter. Add onion and celery, salt and pepper and the thyme or summer savory. (whichever you prefer!) Stir until onion and celery are soft. Add flour. Stir and cook for a few minutes. Slowly add  chicken broth, stirring to combine, making sure there are no lumps. Add turnip. Simmer on low until turnip is cooked and broth has thickened. Add cooked chicken and the peas and carrots. Stir frequently to make sure nothing sticks to the bottom. Let sit on low until chicken and peas and carrots are hot. Set aside.

Pre-heat oven to 350 degrees F. 

Topping:

2 cups all purpose flour
1 tsp baking powder
1/2 tsp baking soda
1/4 tsp salt
1/2 cup unsalted butter, cold and cut into pieces
1 tsp cracked black pepper
1 tsp thyme or summer savory
2/3 - 3/4 cup of buttermilk (I use 1 cup of milk with 1 Tbsp of vinegar....stir and sit for 5 minutes!)

Combine the flour, baking powder, baking soda, salt, pepper and herb of your choice. Cut in butter with pastry blender or your hands until you have pea size pieces of butter/flour. With a fork, stir in the buttermilk. A little at a time to just combine to make a nice dough. Do not over mix! Roll out onto a floured surface and roll out to fit the top of a 9-inch square deep, glass baking dish. Grease your dish well and pour in filling mixture. Carefully place dough on top! Brush with remaining buttermilk. Place in hot oven and cook for 20-25 minutes until golden brown and bubbly! :) Enjoy!

(Sorry I don't have a photo right now...if I can find one, I will add it!)

Wednesday 30 May 2012

Back On The Water

Hello there,
it's been awhile. So sorry I haven't been posting anything. I am officially back to work. Been on board this vessel for 18 days now....and I have another 15 or so to go. Cooking for a crew of 80, three meals a day. I am really enjoying it, learning a lot and working hard, but some days are tough. Nights are tough. I have a room to myself and time to think. My mother just lost her brother to Cancer 5 days ago. He was buried yesterday. My birthday. We just went through this not even 4 months ago. : (  I know what his daughter is going through and I wish I could have been there for my family. But duty calls....and I must stay put and keep on plugging.
I wanted to post about food tonight and give you a nice run through on Chicken Pot Pie...but that will have to wait. Time for bed. It has been another long 12 hour day. Take care.

Love and Hugs

Tuesday 8 May 2012

The Blooming Onion

I've been trying to stay away from television shows that include food in the evening times, but yesterday Darryl insisted I watch Chuck's Day Off with him. Chuck Hughes is a favourite of mine and we've been trying to plan a trip to Montreal for a few years now to go to his restaurant but it just hasn't happened yet. The episode we actually watched had nothing to do with my craving for a Blooming Onion....which I haven't had in years. They are a popular item at restaurants serving pub style food items and seemed pretty straight forward. Off to google! This is how is went down....

Blooming Onion
Dipping Sauce:
1/2 cup mayonnaise
3/4 tablespoon ketchup
2 Tbsp Worcestershire sauce
2 Tbsp Green Relish
1 Tbsp Minced onion (I used the onion from the center of the whole onions)
1/4 teaspoon paprika
1/4 teaspoon salt
1 pinch ground black pepper
1 pinch cayenne pepper

1 egg
1 cup milk

1 cup all-purpose flour
1 1/2 teaspoons salt
1/2 teaspoon cayenne pepper
1/2 teaspoon ground black pepper
1/2 teaspoon garlic powder
1/4 teaspoon dried thyme
1/4 teaspoon dried oregano
1/8 teaspoon ground cumin

1 large onion (Preferably Spanish or Sweet)
2 quarts vegetable oil for deep-frying


1. Make the dipping sauce: Combine first 9 ingredients together. Cover and place in refrigerator until ready to use.
2. Beat egg and combine it with milk in a bowl large enough to hold the onion. In another bowl, combine flour, salt, cayenne pepper, black pepper, garlic powder, thyme, oregano, and cumin.

3.  Prepare the onion: cut approximately 3/4 to 1 inch off of the top and bottom of the onion, remove skin. Remove the 1-inch diameter core from the middle of the onion. Using a large, sharp knife, slice down the center of the onion about 3/4 of the way down, turn 90 degrees and slice again. Keep slicing the sections in half, being careful not to cut to the bottom, until you have 16 sections. Spread the petals apart to make coating easier. Place in a bowl with ice water and allow to sit for at least an hour to help onion petals to spread apart. (I was impatient and didn't allow for this to take place!)


4.  Dip the onion in the milk, then coat well with the flour mixture. Separate the petals again and sprinkle the flour mixture between them. Once you have coated all of the petals well, dip it into the milk and into the flour mixture again. Place in the refrigerator for at least 15 minutes while you preheat the oil.


5.  Pour enough oil to cover the onion into a deep fryer or deep pot. Preheat the oil to 350 degrees F (175 degrees C).

6.  Fry the onion right side up in the oil for 10 minutes or until golden brown. Remove from oil and let drain in a rack or paper towels.                


7. Serve warm with your dipping sauce!


Enjoy!

There are many different recipes out there for The Blooming Onion. My boys gave me two thumbs up on this one so I think this will be "the one". This would work for onion rings..and maybe a little easier, so if you don't feel like doing the extra work, just use the seasoned flour recipe for onion rings. I tweaked it a little and the sauce is my own concoction. 

:) Happy Cooking! 

Monday 7 May 2012

Spanakopita

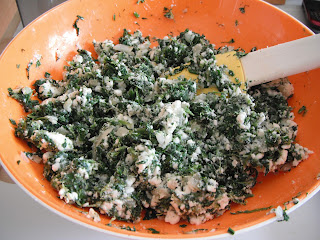
My neighbor and friend, Debi, is a great cook! We are lucky to have a few of them in our neighborhood actually. But she is queen of Spanakopita! When planning a little get together to celebrate my recent success, I decided I wanted to give these tasty triangles a go. Here are the photos and the recipe (which I changed a little)! I hope you enjoy!
Spanakopita
500g frozen spinach, thawed and drained (squeezed dry)
1 med onion, finely diced
1 cup chives, chopped fine
1/2 cup cottage cheese
1/2 cup shredded old white cheddar
1 cup feta, crumbled
1/4 cup grated Parmesan cheese
2 tsp dried dill weed
4 eggs
Salt and Pepper
Olive Oil
Butter
Phyllo pastry


1. Saute onions in a little olive oil until cooked, but not brown.
2. Combine spinach, onion, chives, cheeses and dill weed. Taste. Season with salt and pepper.
3. Beat the eggs and add to spinach mixture.
4. Prepare a surface for assembling and melt butter. Prepare a pan with parchment paper.
5. Lay out phyllo and cover with damp cloth to keep from drying out.
6. Separate phyllo sheets and layer three with melted butter between each sheet.
7. With a pizza cutter and preferably, a ruler, divide the sheets into 6 equal parts (or 4 depending on how big you want your Spanakopita!)
8. Place a nice dollop of filling mixture at the bottom of each piece of pastry.
9. Begin to fold up into triangles, buttering the pieces at the end.
10. Place on prepared pan.
11. If baking right away, preheat oven to 400 degrees F. Bake for 20 minutes or until golden. Flip halfway. If you want to cook them at a later time, place in freezer on the pan and freeze for 2 hours. Remove from pan and place in a freezer bag. No need to thaw before cooking, bake right from frozen!
These can be made and kept frozen for up to three weeks! 

:) Happy Cooking

Thursday 3 May 2012

Drunken Chicken

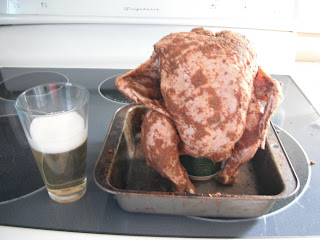
Chicken is my favourite ingredient. It is so versatile. You can do anything with chicken. It is the most popular poultry in the world. (Turkey being the second!) One of my go-to-meals for whole chicken is Drunken Chicken. Ofcourse you could subsitute the beer with gingerale or another bubbly beverage of your choice, but I prefer a nice pale ale.


Drunken Chicken

2lb chicken, whole, cleaned and dry
1 Tbsp Garlic Powder
1 Tbsp Onion Powder
1 Tbsp Chili Powder
1 Tbsp Smoked Paprika
1 Tbsp Italian Seasoning
1 tsp Black Pepper
1 tsp Salt


Mix all seasonings together and place everything in a ziploc bag. Refridgerate overnight.


Preheat oven to 400 degrees F.
Open a can of your favorite beer. Pour half in a glass for yourself and set your bird up on the can with the remainder of the beer in it. Make sure the can goes right up inside the cavity and the bird it sitting up straight!
Place in oven for about 45 minutes.
After 45 minutes, start basting with your favorite BBQ sauce every 10 - 15 minutes.
Your bird should be done after about 1 1/2 hours. Check internal temperature with a meat themometer and it should be 180 degrees. Remove from oven and tent with foil and let rest 15 minutes before slicing!
Ta daaaaaa!

So moist and delicious!

Serve it up with your favorite side dishes and enjoy!

Happy Eating!
xo


Wednesday 2 May 2012

Escargot Stuffed Mushroom Caps

Darryl has always been known around here for his delishes Sausage Stuffed Mushroom Caps (which I will post later!). Since I moved in the job of making them usually falls on me. They are very good and always a big hit at parties. I was planning on making them one evening for a little appetizer for supper for friends, but decided on something different. Escargot Stuffed Mushrooms! These little bites of garlicy-buttery goodness get your senses flowing and you may just find yourself fighting for the last one!


1 can Escargot, drained and rinsed
25 Medium mushrooms, cleaned and stems removed
3 Garlic cloves
2 Shallots
2 Tbsp fresh Parsley, chopped
Fresh Black Pepper
1 cup Butter, room temperature
Itlian Style Bread Crumbs
Parmesan cheese

In a small food processor, mince garlic and shallots. Add Black pepper and butter. Whiz around till smooth. Add parsley, and pulse to just mixed in. Set aside.
Preheat oven to 375 degrees celcius.
Line a baking sheet with foil and spray lightly with cooking spray. Place an escargot in each mushroom cap. Spoon a nice amount of your garlic shallot butter into each mushroom cap with the escargot. Sprinkle with bread crumbs and parmesan cheese. Bake for 15 to 20 minutes until mushrooms are soft and the centers are bubbly!
Serve hot!


Monday 30 April 2012

Down the coast of Newfoundland...


On Saturday, My friend took me for a drive down the west coast. We visited Margree, Isle aux Morts, Burnt Islands, Diamond Cove, and Rose Blanche. Here are few photos I took along the way! This is why Newfoundland is called, THE ROCK! 
Maragree, NL


Rose Blanche, NL

Rose Blanche Light House


Small Town Fun

I just returned from a week in Port aux Basque, Newfoundland. I had to travel there for a five day Marine Advance First Aid course for work. I know a few people through work and a friend from back home lives there, so I figured I'd get to do some catching up. I was due to travel back across the gulf for home on Friday but due to high winds I got an extra day.
I was also waiting all week to hear if I passed my exam for my Journeyman Red Seal Cook papers. After totally annoying my boyfriend to check the mail every day, Friday the letter arrived. I can not tell you the mix of emotions that ran through my body! I passed with flying colours! I laughed, cried and couldn't stop smiling! Finally, the one thing I have worked so hard for was complete! Time to celebrate!
Friday I had planned to cook a meal for my friend Collette and my new friend, Joanne. My first meal with my Red Seal!
Something simple, but something yummy! Greek Salad, my version of Chicken Soulvaki and Oven Roasted Potatoes!
Top it off with a great glass of white wine, and we were all set. Thank you Joanne for welcoming me into your home!

Mmmm!

Greek Salad

1 head - Romaine Lettuce, Cleaned and Chopped
1/4 Red Onion, Thinly Sliced
10 Cherry Tomatoes
1/2 Red Pepper, Cut into Chunks
1/2 Orange Pepper, Cut into Chunks
1/2 English Cucumber, Sliced
Feta Cheese
Kalamata Olives


Vinegarette

1/4 cup Balsamic Vinegar
1/2 Cup Olive Oil
1 Tbsp Dijon mustard
Pepper

Put all ingredients into a mason jar and shake shake shake! :)


Chicken Soulvaki

6-8 Boneless Skinless Chicken Thighs (or breast)
2 cloves garlic, minced
1 Tbsp Oregano
1 tsp fresh black pepper
1/4 cup Lemon juice
1/2 cup Oil
1 tsp Dijon mustard

Mix all together in a zip-lock bag and refrigerate over night.
Remove from bag and season with salt.
Pan fry or BBQ

Oven Roasted Potatoes

3 - 4 Potatoes, I like Red Skinned or Baby Potatoes
Scrub and Cut into uniform pieces
1 Tbsp Oregano
1 Tbsp Garlic Powder
1 Tbsp Onion Powder
Salt and Pepper
Olive Oil
Butter

Pre-heat oven to 400 degrees.
Toss potatoes in seasonings and enough oil to make the seasonings stick. Pour into baking dish and top with a few dabs of butter. Bake for 20 - 40 minutes tossing every 10 minutes until golden brown and cooked through.


:) Good times with Good ladies!

Sunday 22 April 2012

Good Friends and Good Food


Darryl didn't want any fuss over his birthday, so the night before we just invited our good friends and neighbours, Norman and Frances over for supper and to watch the hockey playoffs. Frances introduced me to these pulled pork sandwiches a few weeks back when she came over and cooked supper for us. They were so good I decided to try them out and have them over! Here's the recipe:

Pulled Pork (Serves 4)
1 large pork tenderloin, trimmed and silver skin removed
1 Tbsp Garlic powder
1Tbsp Onion powder
1 Tbsp Smoked paprika
1 Tbsp Italian herb mix
1 Tbsp Chili powder
1/2 Tbsp Black Pepper

Place everything in a freezer bag and coat the tenderloin well. Refrigerate over night, and up to 48 hours.

Preheat oven to 200 degrees F. Place tenderloin in small roasting pan or something with a lid. Season well with salt. Pour in one can of Coca-Cola or Root Beer (I'm sure Ginger ale would be good too!) Cover and bake for 4 hours.

Make BBQ sauce and set aside. When tenderloin is cooked, pour off remaining liquid into a bowl and reserve. Using two forks, shred meat. Add back some of the liquid and enough of the BBQ to make it as moist as you like it! Serve on toasted buns with or without mozza cheese. (Coleslaw is good too!)

BBQ Sauce
(You can use your favourite!)

3/4 Cup Diana's Chicken and Rib Sauce
3/4 Cup Dave's Mild Sauce
1/2 Cup Ketchup
1/2 Cup Kraft original BBQ sauce
2 Tbsp Worcestershire sauce
1 tsp Fresh Black Pepper


Spinach Salad

Baby Spinach
Hard Boiled Eggs
Bacon Bits
Red Onion
Mozza Cheese
Fresh Mushrooms, cooked in some of the bacon grease

Dressing
1/2 cup Balsamic Vinegar
1 Tbsp Honey
1/2 cup Extra Virgin Olive Oil
1/2 cup Canola Oil
salt and pepper

Place all ingredients in a mason jar and with lid on tight, SHAKE SHAKE SHAKE!

:) Enjoy!


Mayflowers...a sure sign that spring has arrived! :)