Hello there,
it's been awhile. So sorry I haven't been posting anything. I am officially back to work. Been on board this vessel for 18 days now....and I have another 15 or so to go. Cooking for a crew of 80, three meals a day. I am really enjoying it, learning a lot and working hard, but some days are tough. Nights are tough. I have a room to myself and time to think. My mother just lost her brother to Cancer 5 days ago. He was buried yesterday. My birthday. We just went through this not even 4 months ago. : ( I know what his daughter is going through and I wish I could have been there for my family. But duty calls....and I must stay put and keep on plugging.
I wanted to post about food tonight and give you a nice run through on Chicken Pot Pie...but that will have to wait. Time for bed. It has been another long 12 hour day. Take care.
Love and Hugs

Wednesday 30 May 2012
Tuesday 8 May 2012
The Blooming Onion
I've been trying to stay away from television shows that include food in the evening times, but yesterday Darryl insisted I watch Chuck's Day Off with him. Chuck Hughes is a favourite of mine and we've been trying to plan a trip to Montreal for a few years now to go to his restaurant but it just hasn't happened yet. The episode we actually watched had nothing to do with my craving for a Blooming Onion....which I haven't had in years. They are a popular item at restaurants serving pub style food items and seemed pretty straight forward. Off to google! This is how is went down....
1. Make the dipping sauce: Combine first 9 ingredients together. Cover and place in refrigerator until ready to use.
2. Beat egg and combine it with milk in a bowl large enough to hold the onion. In another bowl, combine flour, salt, cayenne pepper, black pepper, garlic powder, thyme, oregano, and cumin.


Blooming Onion
Dipping Sauce:
1/2 cup mayonnaise
3/4 tablespoon ketchup
2 Tbsp Worcestershire sauce
2 Tbsp Green Relish
1 Tbsp Minced onion (I used the onion from the center of the whole onions)
1/4 teaspoon paprika
1/4 teaspoon salt
1 pinch ground black pepper
1 pinch cayenne pepper
1 egg
1 cup milk
1 cup all-purpose flour
1 1/2 teaspoons salt
1/2 teaspoon cayenne pepper
1/2 teaspoon ground black pepper
1/2 teaspoon garlic powder
1/4 teaspoon dried thyme
1/4 teaspoon dried oregano
1/8 teaspoon ground cumin
1 large onion (Preferably Spanish or Sweet)
2 quarts vegetable oil for deep-frying
1. Make the dipping sauce: Combine first 9 ingredients together. Cover and place in refrigerator until ready to use.
2. Beat egg and combine it with milk in a bowl large enough to hold the onion. In another bowl, combine flour, salt, cayenne pepper, black pepper, garlic powder, thyme, oregano, and cumin.


3. Prepare the onion: cut approximately 3/4 to 1 inch off of the top and bottom of the onion, remove skin. Remove the 1-inch diameter core from the middle of the onion. Using a large, sharp knife, slice down the center of the onion about 3/4 of the way down, turn 90 degrees and slice again. Keep slicing the sections in half, being careful not to cut to the bottom, until you have 16 sections. Spread the petals apart to make coating easier. Place in a bowl with ice water and allow to sit for at least an hour to help onion petals to spread apart. (I was impatient and didn't allow for this to take place!)

4. Dip the onion in the milk, then coat well with the flour mixture. Separate the petals again and sprinkle the flour mixture between them. Once you have coated all of the petals well, dip it into the milk and into the flour mixture again. Place in the refrigerator for at least 15 minutes while you preheat the oil.


5. Pour enough oil to cover the onion into a deep fryer or deep pot. Preheat the oil to 350 degrees F (175 degrees C).
6. Fry the onion right side up in the oil for 10 minutes or until golden brown. Remove from oil and let drain in a rack or paper towels.

7. Serve warm with your dipping sauce!

Enjoy!
There are many different recipes out there for The Blooming Onion. My boys gave me two thumbs up on this one so I think this will be "the one". This would work for onion rings..and maybe a little easier, so if you don't feel like doing the extra work, just use the seasoned flour recipe for onion rings. I tweaked it a little and the sauce is my own concoction.
:) Happy Cooking!
Monday 7 May 2012
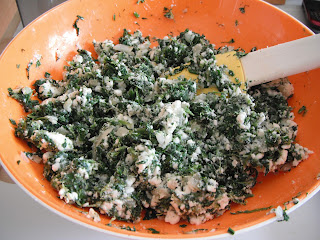
Spanakopita
My neighbor and friend, Debi, is a great cook! We are lucky to have a few of them in our neighborhood actually. But she is queen of Spanakopita! When planning a little get together to celebrate my recent success, I decided I wanted to give these tasty triangles a go. Here are the photos and the recipe (which I changed a little)! I hope you enjoy!


Spanakopita
500g frozen spinach, thawed and drained (squeezed dry)
1 med onion, finely diced
1 cup chives, chopped fine
1/2 cup cottage cheese
1/2 cup shredded old white cheddar
1 cup feta, crumbled
1/4 cup grated Parmesan cheese
2 tsp dried dill weed
4 eggs
Salt and Pepper
Olive Oil
Butter
Phyllo pastry

1. Saute onions in a little olive oil until cooked, but not brown.
2. Combine spinach, onion, chives, cheeses and dill weed. Taste. Season with salt and pepper.
3. Beat the eggs and add to spinach mixture.

4. Prepare a surface for assembling and melt butter. Prepare a pan with parchment paper.
5. Lay out phyllo and cover with damp cloth to keep from drying out.
6. Separate phyllo sheets and layer three with melted butter between each sheet.

7. With a pizza cutter and preferably, a ruler, divide the sheets into 6 equal parts (or 4 depending on how big you want your Spanakopita!)
8. Place a nice dollop of filling mixture at the bottom of each piece of pastry.
9. Begin to fold up into triangles, buttering the pieces at the end.

10. Place on prepared pan.

11. If baking right away, preheat oven to 400 degrees F. Bake for 20 minutes or until golden. Flip halfway. If you want to cook them at a later time, place in freezer on the pan and freeze for 2 hours. Remove from pan and place in a freezer bag. No need to thaw before cooking, bake right from frozen!
These can be made and kept frozen for up to three weeks!

:) Happy Cooking
Thursday 3 May 2012
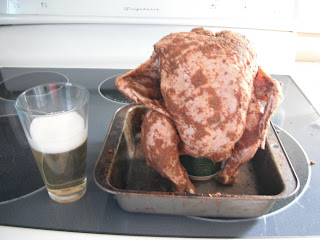
Drunken Chicken
Chicken is my favourite ingredient. It is so versatile. You can do anything with chicken. It is the most popular poultry in the world. (Turkey being the second!) One of my go-to-meals for whole chicken is Drunken Chicken. Ofcourse you could subsitute the beer with gingerale or another bubbly beverage of your choice, but I prefer a nice pale ale.


Drunken Chicken
2lb chicken, whole, cleaned and dry
1 Tbsp Garlic Powder
1 Tbsp Onion Powder
1 Tbsp Chili Powder
1 Tbsp Smoked Paprika
1 Tbsp Italian Seasoning
1 tsp Black Pepper
1 tsp Salt
Mix all seasonings together and place everything in a ziploc bag. Refridgerate overnight.

Preheat oven to 400 degrees F.
Open a can of your favorite beer. Pour half in a glass for yourself and set your bird up on the can with the remainder of the beer in it. Make sure the can goes right up inside the cavity and the bird it sitting up straight!
Place in oven for about 45 minutes.
After 45 minutes, start basting with your favorite BBQ sauce every 10 - 15 minutes.
Your bird should be done after about 1 1/2 hours. Check internal temperature with a meat themometer and it should be 180 degrees. Remove from oven and tent with foil and let rest 15 minutes before slicing!

Ta daaaaaa!

So moist and delicious!
Serve it up with your favorite side dishes and enjoy!
Happy Eating!
xo
Wednesday 2 May 2012
Escargot Stuffed Mushroom Caps
Darryl has always been known around here for his delishes Sausage Stuffed Mushroom Caps (which I will post later!). Since I moved in the job of making them usually falls on me. They are very good and always a big hit at parties. I was planning on making them one evening for a little appetizer for supper for friends, but decided on something different. Escargot Stuffed Mushrooms! These little bites of garlicy-buttery goodness get your senses flowing and you may just find yourself fighting for the last one!


1 can Escargot, drained and rinsed
25 Medium mushrooms, cleaned and stems removed
3 Garlic cloves
2 Shallots
2 Tbsp fresh Parsley, chopped
Fresh Black Pepper
1 cup Butter, room temperature
Itlian Style Bread Crumbs
Parmesan cheese
In a small food processor, mince garlic and shallots. Add Black pepper and butter. Whiz around till smooth. Add parsley, and pulse to just mixed in. Set aside.
Preheat oven to 375 degrees celcius.
Line a baking sheet with foil and spray lightly with cooking spray. Place an escargot in each mushroom cap. Spoon a nice amount of your garlic shallot butter into each mushroom cap with the escargot. Sprinkle with bread crumbs and parmesan cheese. Bake for 15 to 20 minutes until mushrooms are soft and the centers are bubbly!
Serve hot!
Subscribe to:
Posts (Atom)